Nothing fancy, but I installed the Twitter WordPress Sidebar Widget tonight… Now that I have a Twitter client on Ubuntu, I figured it was time to start sending out a few tweets. I’m tired of my sister yelling at me about not tweeting anymore!


Aug 31 2008
Nothing fancy, but I installed the Twitter WordPress Sidebar Widget tonight… Now that I have a Twitter client on Ubuntu, I figured it was time to start sending out a few tweets. I’m tired of my sister yelling at me about not tweeting anymore!
Aug 31 2008
 Hopefully, this will jump start your Eclipse-Tomcat Integration. It is not really that hard, but I made some assumptions that wasted a bunch of time. I’m not sure if this is completely correct, but it will minimally allow you to deploy and debug multiple web applications from within Eclipse.
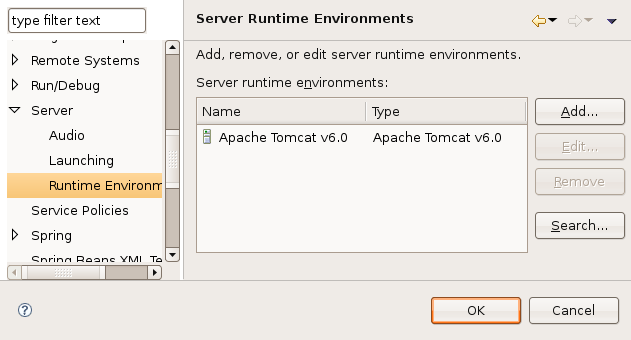
The first step is to connect a Tomcat server installation with Eclipse. This is simple, but had the first gotcha. It appears that the Tomcat installation must be “writable” by the user id running eclipse. I selected my default Ubuntu Tomcat installation, which was owned by root, and I could never associate it with a project. So, on a whim I installed another copy in my home directory (/home/phil/software/apache-tomcat-6.0.18) and solved the problem. I’m not exactly sure why the image has to be writable, but I did not want to spend any more time on that problem. Once you have Tomcat installed, goto Window / Preferences / Server / Runtime Environment in the Eclipse menu. Click the Add button and select Tomcat6.0, and your new Tomcat installation. I have mine wired to Sun’s Java 1.6 JRE, but don’t know if I’ll be using any 1.6 features.
 For the next step, you have to create a “Dynamic Web Project” or convert an existing one. This is required for the deployment process to work; Eclipse will not recognize any other project types. There are just a couple of configuration lines that need to be added to your .project file if you want to convert and existing project. However, you project must be in the proper format (directory structure) for this to work. The simplest way is to create a new “Dynamic Web Project” and compare the .project file to your current one; copy the changes over and you should be good to go. When you see the little blue world icon next to the project name, you know it worked
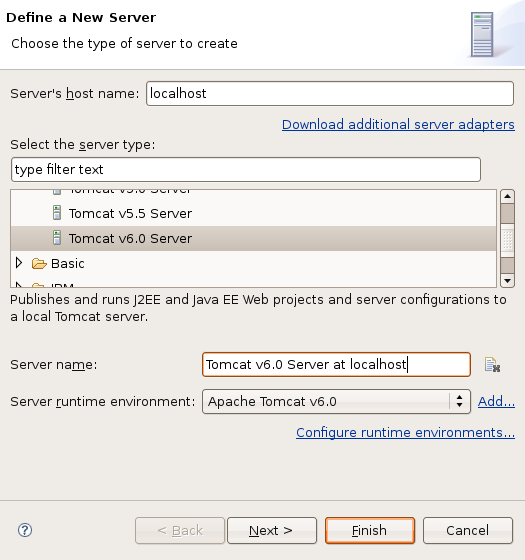 .
.
Now it is time to configure your server instance. You need to add the “Servers” view on whatever perspective you are using; this is typically done under Window / Show View / Other menu from Eclipse. On the Server view, right click and select New / Server. Select the appropriate Tomcat version and leave all of the other options alone. Click the Next button and you will be able to “Add and Remove Projects” for this configuration. Select your web project, click Add, followed by the Finish button.
At this point, you will see the Tomcat instance added to your view. The most interesting thing to me, was that a “Servers” project was created in the “Project Explorer” view. It appears to be a copy of all of your Tomcat configuration files. This originally confused me, as I tried to access the Tomcat administration pages and generated a ton of page not found issues. It appears that this is running a minimal Tomcat configuration,  and nothing but your projects are deployed with this configuration. This configuration seems to be “disconnected” from the installation directory. There appear to be a couple of ways to configure the instance, but the more I thought about it, I figured it really did not matter! This was simple and worked; all I really need to do is compile, deploy, and debug my web application.
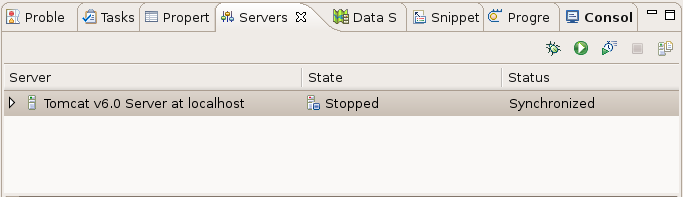
The real convenience is in the Servers tab. You can start and stop your instance from this view. Additionally it will automatically synchronize and restart the server based on what is happening within the web project. The best part is that when you start Tomcat in debug mode, all breakpoints will be recognized and Eclipse will switch over to the Debug perspective if it hits one. No messing around with connecting to running Tomcat instances, just plain and simple, just like debugging any other Java unit test or application.. .