
![]() I have been a big fan of Buffalo Technology products for some time. I purchased a couple of their NAS storage devices and use them as my primary backup solution. After working flawlessly for years, my first LinkStation died on me; it was was the original version and only had a 160GB drive. We had a home office setup in our barn; I moved the LinkStation out there, just in case we ever had a fire in the house. The embedded print server was a nice addition, allowing us to print from anywhere in the house. Unfortunately, I think the barn was a tad bit dirtier than the LinkStation preferred. Even though the office was in a separate room, it was next to my wood shop and must have sucked in a lot of dirt and dust. As you can see from the picture below, there was a lot of black gunk on the fan intake, which ultimately caused the fan to fail. The device would still power up, but the hard drive would spin up and then quickly shutdown. Buffalo’s built in diagnostics indicated that the internal fan had failed, and unfortunately, this prevented the NAS from working at all. What a drag! I did a little bit of research and found the suggested replacement fan on the Buffalo forums. Amazingly, they wanted about $20 for a new fan. I thought that was a little too steep; considering that can you get a 12omm case fan for under $5! I did some more Googling and found one for for $4 with free shipping; I figured why not!
I have been a big fan of Buffalo Technology products for some time. I purchased a couple of their NAS storage devices and use them as my primary backup solution. After working flawlessly for years, my first LinkStation died on me; it was was the original version and only had a 160GB drive. We had a home office setup in our barn; I moved the LinkStation out there, just in case we ever had a fire in the house. The embedded print server was a nice addition, allowing us to print from anywhere in the house. Unfortunately, I think the barn was a tad bit dirtier than the LinkStation preferred. Even though the office was in a separate room, it was next to my wood shop and must have sucked in a lot of dirt and dust. As you can see from the picture below, there was a lot of black gunk on the fan intake, which ultimately caused the fan to fail. The device would still power up, but the hard drive would spin up and then quickly shutdown. Buffalo’s built in diagnostics indicated that the internal fan had failed, and unfortunately, this prevented the NAS from working at all. What a drag! I did a little bit of research and found the suggested replacement fan on the Buffalo forums. Amazingly, they wanted about $20 for a new fan. I thought that was a little too steep; considering that can you get a 12omm case fan for under $5! I did some more Googling and found one for for $4 with free shipping; I figured why not!

Getting the box apart was a little challenging; I did the typical man thing – did no research and just grabbed a couple of screwdrivers! I did find some good instructions, after I was done with my project! There was one primary screen in the back, that basically holds the whole thing together. Once you get the case apart, it is quite easy from there. I was pretty impressed with the clean design, the main system board and an auxiliary power board, which eliminates the need for an external power block. To replace the fan, I just snipped the three wires and spliced in my new one. Once I remembered how to put all of the pieces back together, it was a snap. Literally, the case almost snaps together; the hard drive bracket pops into the enclosure and the only screws are to hold the system board onto the hard drive bracket. There were two small screws that secure the power board, but that is it!

So, the real question is, did it it work after I put it back together? The answer is sort of! Actually, I think it worked fine. I could connect to it through the web interface and my son’s Windows 7 computer was able to mount the file system and save files. Unfortunately, neither my Ubuntu box or MBP was able to mount those partitions. Both computers could see the box on the network, but when I clicked on the device to access the shared file systems, they both complained that nothing was exported. I believe these old LinkStations were supposed to support all operating systems, but I honestly have not used it for so long, I cant’ remember if it ever worked with Linux. My newer LinkStation NAS works with all of the computers, with no problems at all, so it is kind of strange!
 While I was doing research on the LinkStation, I found a really cool site called NAS-Central. I know I should not be surprised, but as I was disassembling the device, it struck me that it was way more than a simple NAS device, it was a just another computer. I really never thought about the internals, I just wanted something that I could plug an Ethernet cable into and save some data! NAS devices are actually pretty cool, but not really that exciting! You basically just plug them it and forget about them; they are a true network appliance. Little did I know, just like people who build custom ROMs for cellphones, they do the same thing for these NAS devices… You can easily turn your LinkStation (or other NAS device) into a real Linux server, with a wide variety of additional capabilities. I have not decided what I’m going to do with my old LinkStation yet, but if I get really bored, I might have to give of of these distributions a try! If you ever decide to purchase a NAS device, make sure you have Buffalo a look. I have several friends and family members who purchased LinkStations, and I have yet to hear about any problems! I think Buffalo makes a pretty solid product, I’m sold!


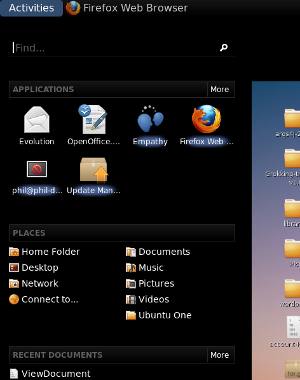 Half of the fun of playing with Linux is trying out new stuff! I found a blog the other night that talked about
  After using it for a couple days, I have learned there are multiple ways to navigate around, minimizing the clicks. The “Find” is one such short cut, you can quickly find an application in the menu system. It still has the good old fashioned alt-tab behavior to quickly switch between applications. The only option that was not obvious to me, was the virtual desktops. I’m not a big virtual desktop user any more (too much time on a Windows box during the day!); it did seam a little easier with the 2.x desktop (just needed to scroll the mouse w
 heel, I think).. Now you can dynamically (and easily) add new desktops through the activities menu (just click the plus icon). There is probably a nice short to to navigate between desktops, but I did not look for it. One other usability note that is not completely obvious; you don’t actually have to click on the word “Activity” to get access to the menu, just push the mouse all the way to the corner and the menu pops up… Nice…
 A couple of other interesting things I found on the
  Apparently, I like to live dangerously; last week I upgraded my Ubuntu box to the 9.10 beta. Unlike my last upgrade, this one went off without a hitch. Not surprisingly, I seem to have 100MB updates every other day, but even so, the box is rock solid. The only annoying thing is that many of the updates make me reboot, I almost feel like I’m running Windows! The list of
  Throw in
 My Ubuntu 64-bit 9.04 upgrade did not go very smoothly, it left my machine un-bootable. The upgrade downloaded all of the packages, but seemed unable to install anything. The detail window was full of the same message, something about a dpkg failure. I was really bumming, as the upgrade on my 32-bit laptop worked flawlessly. I hoped that I could recover my blog, but was not exactly sure how it would workout. I tried using chroot after booting from the CD, but the install messed up the file system so badly, nothing would run.
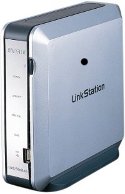 It was pretty easy to recover MySQL and WordPress. I never took the time to figure out how to backup MySQL, so I was a little worried about losing my blog data; I guess that will now be my number one priority. The restore was as simple as copying all of the files from /var/lib/mysql and /var/www from my old drive to the new drive. I just had to change the file owners and groups, restart MySQL, and my blog was back, up and running. Not too bad!
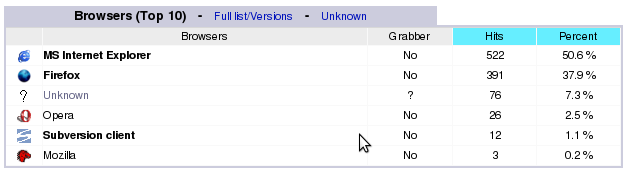

 This was not one of my more pleasant Linux experiences. The upgrade seemed to take more than it gave! Anyway, my issues have finally settled down and everything is almost working. (I’m starting to miss downloading my daily bug fixes!) I believe the only real issue I have is SAMBA; I cannot access my NAS device anymore (or any windows boxes for that matter). That is kind of a drag when you need to share files!
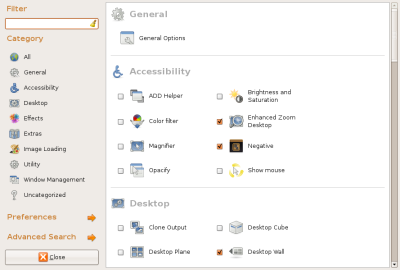
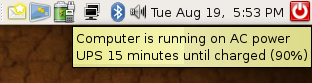 only $50. I have been looking for a reasonably priced unit for some time now, but found no really good deals. So, what really amazed with with this one, was the fact that you could download Linux software for it, and it actually works! Pretty cool, it even gave me a little icon that shows it was working. There is a small daemon that runs which communicates with the UPS unit. You can configure the daemon to respond to multiple events, such as power failures or low battery status. I know this is not big deal, as this functionality has existed for Windows-based solutions for many years, I was just really surprised it worked so easily. Just plug it in and run the setup program. Now I’m ready for all of the power hits we get out here in the country!
 Probably doing more messing around than I should be, but I think I’m finally done. My main goal is no more Microsoft Windows! We have a laptop which I will use to do my checkbook and any other mundane tasks, but everything else I want to do on this new machine. When I was looking for software to install to make the machine feel more slick, I happened upon