
 This is an extremely interesting concept, but I really wonder how it works in the real world. Toy projects are one thing, but real production size applications are a different story! The principle is very simple; just modify a piece of code in your project and the IDE automatically executes all of the unit tests. Pretty cool concept. But, what if your unit test suite runs for several hours? I believe this is an all too common problem. I have seen many projects dedicate time to building their unit tests, and over time, end up with test suites that can run for multiple hours. There is a very negative side effect associated with this scenario, it can change a developer’s attitude towards checking in code, it actually discourages it. If the developer knows their commits will not be validated for several hours, they tend to check in very infrequently and only when they feel it will not impact other developers. Many factors can contribute to this scenario. The primary factor is that many of these tests are not really unit tests; they typically do not provide the proper isolation (via mocking) and take too long to execute. I’m not going to address those issues directly, but the concept does support and encourage the idea of quick test execution.
 Wouldn’t it be cool to run all of the unit tests, in your IDE before checking in the your changes? Obviously, this action is expected by the developer and is completely possible without any special tools. However, it is not automatic and requires extra effort by the developer. Usually, it is easier to let the Continuous Integration server run the tests and fix the fallout later. It seems like a simple problem to solve; create a plug-in that automatically executes all of the unit tests saving a file, requiring no additional effort or interaction from the developer. If you are an Eclipse user, you have two good options, JUnit Max and Infinitest. I would really like to try Kent Beck’s JUnit Max, but you need to purchase a subscription to use (and even try) the plug-in. That is a show stopper for me, as there are free alternatives such as Infinitest. I evaluated the Infinitest plug-in last year, after it was open-sourced. I did encounter some problems with the plug-in, my Spring-based projects did not work; I was quickly discouraged and abandoned the tool. Months later, I was still intrigued by the idea, so I gave it a try last week on a different project and achieved success!
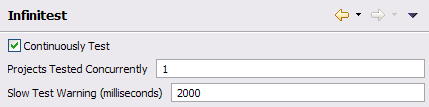
Unfortunately, Infinitest is not currently installable from the Eclipse Marketplace. It can be quickly installed the old fashioned way from the Eclipse update site. There is only one setting you may want to tweak, the Slow Test Warning threshold. If you have unit tests that execute for longer than half a second, Infinitest will add a warning to your Problems View for each one; this could be problematic if you have a large number of long running unit tests. You should also notice a huge new “Continuous Test” status bar in your Eclipse footer. It will update automatically based on your coding activity. JUnit Max is a little more subtle, but provides the same type of feedback mechanism. That’s it, you are now ready to write code and auto test!
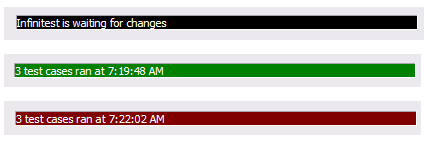 I’m not exactly sure how intelligent these plug-ins are, related to determining which unit tests to execute based on what code was changed. Hopefully that is the next level of continuous testing evolution. However, if you modify a single unit test, Infinitest will only run that single test; beyond that, I don’t believe there is much intelligence. If your code modification causes any unit tests to fail, the status bar will turn red. Unfortunately, it does not tell you how many test failed, it only provides the number of tests which it executed. If you mouse over the status bar, it will display the names of the tests which failed, but you can not click on them, they are just there for feedback. You will need to look in the Problems View to discover which test broke, the view will now contain markers for each failed test.
The only issue I have with the plugin, is around user interaction. It does not provide its own View for test results, it simply adds the failures to the existing items in the Problems View. I assumed that the Unit Test View would be updated with the test results, similar to manually running a unit test; however, this was not the case. It appears that both Infinitest and JUnit Max use the same strategy, providing minimal feedback to the developer. Maybe this a good approach, but I was expecting more visual feedback and confirmation. I associate static problems with the Problems View, such as compiler and code quality errors, not dynamic problems such as test failures. The developer should be able to click on a marker (problem) and be navigated to the exact line of code indicated by that marker, giving them the opportunity to resolve the issue . Here is my problem with this approach, if the developer clicks on the failed JUnit marker, where will they be navigated? The only possible location is the unit test which failed. Generally speaking, this is not where the problem would be found, it would lie in the code that was just changed. Given this issue, I would rather use a different View for continuously executed tests; maybe even better, find a way to reuse the existing Unit Test View.
This does bring up an interesting question, do these plug-ins minimize or eliminate the need for Continuous Integration? I don’t believe this is the case, but would seem to eliminate the need for some of the more advanced features the vendors are implementing. One such example is TeamCity’s remote build, pre-commit test feature. There are many factors to consider, but if unit tests execute quickly, I do not see the need for this functionality to be provided by the CI server. If the tests execute for multiple hours, we could be adding more risk into the process, by not committing changes when they are ready to integrate. Remote build, pre-commit testing sounds valuable on paper, but I am struggling to see the real benefits. I tend to think this functionality over complicates the Continuous Integration process. One of the main benefits of Continuous Integration is that it is seamless and automatic. Nothing is required by the development team to reap the CI benefits, simply check in your code early and often. As more education and process overhead are required by the CI process, it is no longer simple nor free. The focus should be on doing what makes sense, at the right time, in the right place. These IDE plug-ins seem to have correct perspective, pre-check-in on the developers desk, simple, automatic, and efficient.
I hope that you will try to integrate one of these plug-ins into your personal development process. I believe they will help create a more robust development process, creating fewer Continuous Integration failures and ultimately, a more efficient, faster executing test suite. If you have real world experience with one of these tools, please provide some comments. I am still curious, does this approach work on real projects?


 Without first running a setup task in
 I might be dating myself, but when I was a kid, I remember my parents talking about
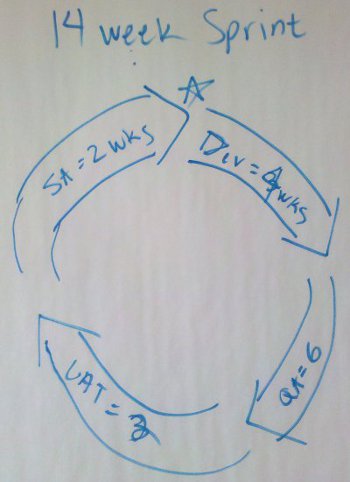
 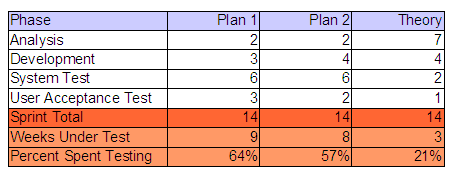 I threw together this little a table to illustrate my point. Based on either combination of values, the project was going to allocate between 57% and 64% of it’s project schedule to testing. Using the worst case numbers, we are talking about 3 times longer to test the code, than actually develop the code. Is it just me or is that crazy? What if you had two (2) months worth of development? Simple math, that would require six (6) additional months to validate! I realize there are or can be several factors contributing to this equation, but I’m pretty sure that we are not talking about a team of twelve (12) developers to one (1) tester, creating an unbalanced capacity situation. Just for fun, I threw a Theory column into my table. I can’t remember where I learned or read this, but I’m sure everyone knows this fact as well…
 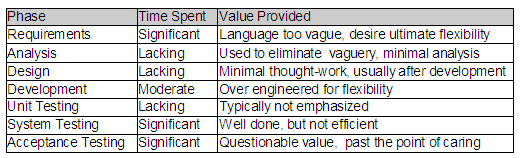 Unfortunately, we seem to be spending too much of our time in the wrong SDLC phase and on the wrong artifacts. I can’t tell you how many times I have seen a hundred (100) page requirements document for a seemingly trivial system. The SDLC mandates that these documents be produced, irregardless of the content’s quality. This is no fault of the business, they simply try to document their needs, given what they know. Because requirements are typically not allowed to evolve and are seldom interpreted correctly by the IT team, the business never gets what they really need. Additionally, the time spent by the testing teams to provide the traceability back to the excessively verbose requirements, while generating and documenting their test cases could almost be considered SDLC overhead. The testers are rarely given a chance to actually automate their test cases, which in my opinion, is the most valuable artifact of their job.
 I was reading the
  I actually found two versions of the document by the author, Steve Pieczko. The

 Earlier this month, Kent tweeted about the “Pragmatic Magazine”. I had been to the “
 I assume that everyone performs some kind of unit testing… The real question is what does unit testing mean to you? For me, it is some form of repeatable, assertion-based approach that can be re-executed by other developers and a continuous integration process. Unit testing is just one piece in my software confidence puzzle. That sounds like a great topic for my next blog! Unfortunately, some developers think that generating some log messages to inspect or stepping through the code with a debugger accomplishes the very same thing. Depending on the competency of the developer, I believe this can be partially true; however what about the next developer who needs to change the code?
 I am kind of tied to Eclipse as my IDE, but do play with NetBeans every so often. I think I could switch to NetBeans, my only real requirement is that the IDE must have Emacs key bindings; some habits are just too hard to break! NetBeans looks like an pretty good tool and seems to be very responsive on my Ubuntu box; I especially like the way it manages plug-ins. One interesting thing that NetBeans does (maybe a little better than Eclipse), is manage unit testing. NetBeans will automatically create the secondary source tree, but seems to default to in-package testing. It is very easy to add the additional test package into the package structure to enable API testing. I also like the way that NetBeans separates the Test Libraries from the regular Libraries. I’m not sure how well this would work when you use a tool like
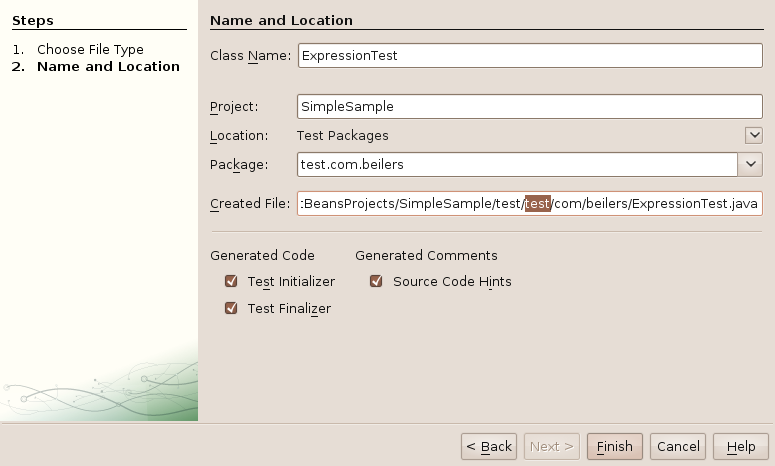

 This was making me crazy the other night… I did not spend too much time on it, thinking is was just me. But, after upgrading my laptop and encountering the exact same problem, I knew there was more too it. It seemed like only the cancel buttons actually worked; all of the next and finish buttons did absolutely nothing, other then beep! I soon realized that I could use the tab key and press enter to move to the next screen; but that did not make me very happy.
 It also
 While looking for the title to my post, I have found a little snippet that calling “
 Factories are so 1990. This is one hurdle that some developers have a tough time understanding. They continue to think about creating objects via factories. There is NO need to ever create a factory when using Spring. Spring is essentially the a super factory, plus it is actually responsible for the life-cycle of those vended objects. There are scenarios where you need to specifically create objects that Spring manages, in a loop for example; but these are very uncommon. The proper way to solve this problem, is to create a bean that is
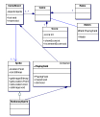 This was an unusual one for me. I recently observed a project that used Spring to created multiple static Singleton factories to vend out a variety of instances, each factory with it’s own Spring context file. Needless to say, this application was far from easy to understand. To my surprise, there was even a factory specifically implemented for creating the business domain objects. Why this was done is still a mystery to me and seems to violate the true spirit of Spring. Why would I ever want to call DomainFactory.getNewWidget() or DomainFactory.getNewGadget()? The configuration had the domain beans defined in a separate Spring context file and oddly, used static methods to initialize specific properties of these new bean instances. There was no way which enabled the XML configuration to be overridden, allowing for different implementations. Worse yet, you were tied to the initialization behavior of the factory methods! Depending on your definition of a domain object, I see very little reason domain object dependency injection.
 This is an interesting use of Ant in a Spring-based application. The idea here is to generate the Spring configuration and properties file from an Ant task, to specifically configure the context files to each deployment environment. They values are essentially baked into the application and unchangeable. It is bad enough to substitute property file values, but some developers actually substitute bean name references. This might be a little hard to follow, but the Spring XML configuration would define two different implementations of the same basic function, each with its own name. When the application is built, the Ant tasks would substitute ref=”bean1” for some environments and ref=”bean2” for others; everywhere that implementation was referenced in the configuration files. Call me crazy, but I don’t think this what the Spring creators ever intended!