May 26 2009

Eclipse – Project Facets

Category: EclipsePhil @ 7:38 pm

This Eclipse feature has been around for a couple years, but seems to stay hidden from most developers; probably because they have not had a chance to take advantage of the Dynamic Web project type. It seems like once a project is setup, nobody ever wants to change it! The Dynamic Web project type is used in conjunction with the Eclipse Web Tools Platform (WTP) plug-in, which has been on my “Upcoming” list for some time now…

<HISTORY>I was a huge fan of the MyEclipse plug-in suite a few years ago; it was a predecessor to the nicely bundled Eclipse distributions that can be downloaded today. MyEclipse provided a very elegant Eclipse / Weblogic integration capability; as well as many other nice features that otherwise were difficult to manually enable. I worked with many different teams and it was always a hassle to convince them to purchase or convert their projects to the structure required by MyEclipse. As I became more familiar with the Ganymede release and the maturing Web Tools Platform plug-in, this Eclipse bundle seemed to be a much easier to sell and better alternative. MyEclipse is still a very popular and well put together product; be as I recall, it always took them too long to catch up with the current Eclipse versions, which I was fond of using as well.</HISTORY>

To use WTP, your project needs to have some additional features, namely Facets. Facets are used to define characteristics and requirements for Java EE projects. Originally, only Java EE projects had Facets; but this seems to be changing. I recently added some J2EE Module Dependencies to a web project, Eclipse enabled Facets in the simple Java project included as a dependency. To convert an existing project to a Faceted project, you need to manually modify your .project file. It is best to only enable Facets and let Eclipse add the additional nature; these natures will be added as you enable extra characteristics. To convert a Java Project to a Web Project, modify the .project file and add the following two lines.

<nature>org.eclipse.wst.common.project.facet.core.builder</nature>
<nature>org.eclipse.wst.common.project.facet.core.nature</nature>
 

You will not notice any visual difference in your project after making this change. However, if you open up your project’s properties and search for the word facet, you will see a new configuration option. At this point, you can select the Dynamic Web Module option and configure your runtime environment (Tomcat, Jetty, etc).

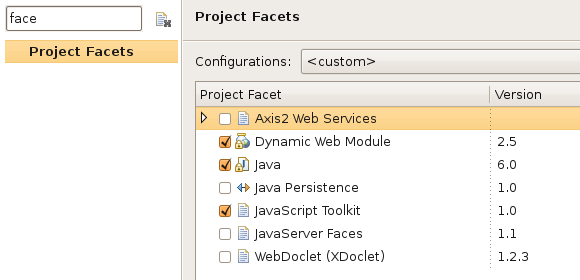
If you have successfully converted your project, you will see a small globe appear on the project folder icon. You can now add the project to the Servers view and easily deploy the project in your locally configured runtime environment. I have glossed over some of the WTP setup, but will cover that in another post. I thought it was important to explain Facets; I had previously wasted significant time, manually converting projects to Dynamic Web projects. Unfortunately, the manual approach only worked about 50% of the time. Once I learned about Facets, it made my life a lot easier!

FYI, the (S) on the folder, next to the globe, indicates a Spring IDE plug-in enabled project.  If you are developing Spring-based applications, you have to install this plug-in; it makes creating and managing your context files many times simpler.

https://www.beilers.com/wp-content/plugins/sociofluid/images/digg_48.png https://www.beilers.com/wp-content/plugins/sociofluid/images/reddit_48.png https://www.beilers.com/wp-content/plugins/sociofluid/images/dzone_48.png https://www.beilers.com/wp-content/plugins/sociofluid/images/stumbleupon_48.png https://www.beilers.com/wp-content/plugins/sociofluid/images/delicious_48.png https://www.beilers.com/wp-content/plugins/sociofluid/images/blinklist_48.png https://www.beilers.com/wp-content/plugins/sociofluid/images/blogmarks_48.png https://www.beilers.com/wp-content/plugins/sociofluid/images/google_48.png https://www.beilers.com/wp-content/plugins/sociofluid/images/facebook_48.png


May 25 2009

Galileo – Eclipse 3.5 Coming Soon?

Category: EclipsePhil @ 8:09 pm

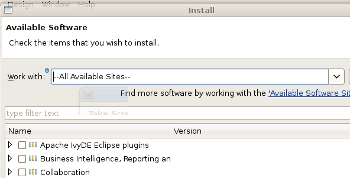
I only played with Galileo for about 10 minutes and I am already very intrigued. Based on my last post, I wanted to see if I could get Ivy and Eclipse to work better together and explore the new features. The first difference appears to be the way that plug-ins are installed and managed. Eclipse 3.4 significantly changed the way plug-ins were installed and it looks like they are changed again. Plug-in management was never as smooth as NetBeans. NetBeans provides a fully integrated solution for searching through available plug-ins, with click and go installation. The new Eclipse implementation looks promising, maybe not as polished as NetBeans, but a step in the right direction. As shown to the right, you can now view all of the available plug-ins in a much more controlled and usable approach. Managing additional software sites is much cleaner than before too.

At first glance, there seems to be a lot of small, subtle changes, rather than any big, must have features. The Eclipse release process appears to be taking longer and longer; the first milestone release was last August! This is the first time I have not jumped on the milestone builds, preferring to stick with the Ganymede release for my daily usage. Another small change is the way the network proxy panel works; it actually seems more complicated than it was before! They finally added (or re-implemented) one on my favorite plug-ins,  the “open implementation” option. How could that feature not been part of Eclipse before this? It is an absolute necessity when programming with Spring. Overall, I think Galileo looks a little more polished than before; I will start using it for my daily work and try to find more interesting new features to report on!

A new to me feature… After adding the IvyDE plug-in to Eclipse, the next step is to add the Ivy managed dependencies to the project. I found a new project properties panel, Java EE Module Dependencies. I thought this was a new feature, but it appears this feature was available in Eclipse 3.4 too. I hoped this was the answer to my Ivy problem! The panel allows you to pick other projects and/or their class path entries to be added as web library dependencies; it suggested that these dependencies would be resolved at deployment time. I gave it a try, but unfortunately it only half worked. The dependent project part worked perfect; making a JAR file out of the secondary project and copying it over to the exploded WAR’s WEB-INF/lib directory. This seems like a good solution when working with external projects, especially when you are activity integrating them into your primary project. The unfortunate part is that Eclipse still completely ignored the Ivy dependencies; not copying any of the Ivy resolved JAR files to the WEB-INF/lib directory. What a drag! I will have to continue my quest for a workable Ivy / WTP solution!

https://www.beilers.com/wp-content/plugins/sociofluid/images/digg_48.png https://www.beilers.com/wp-content/plugins/sociofluid/images/reddit_48.png https://www.beilers.com/wp-content/plugins/sociofluid/images/dzone_48.png https://www.beilers.com/wp-content/plugins/sociofluid/images/stumbleupon_48.png https://www.beilers.com/wp-content/plugins/sociofluid/images/delicious_48.png https://www.beilers.com/wp-content/plugins/sociofluid/images/blinklist_48.png https://www.beilers.com/wp-content/plugins/sociofluid/images/blogmarks_48.png https://www.beilers.com/wp-content/plugins/sociofluid/images/google_48.png https://www.beilers.com/wp-content/plugins/sociofluid/images/facebook_48.png


May 24 2009

Blogging with Live Writer

Category: BloggingPhil @ 3:42 pm

imageAs a developer, I prefer the Ubuntu experience over the Windows experience. However, when I’m updating the checkbook and paying bills, I don’t see many good, non-Windows options. I have been blogging with ScribeFire for quite some time and have been very happy with it . A read a blog on Live Writer some time ago and installed it; foimager some reason I never used it,

I decided to give it a try this weekend and have to say, it is pretty nice. Functionally they are pretty much the same, both integrating nicely with WordPress. Subtle differences include:

  • ScribeFire saves the drafts on the server, where as Live Writer saves them locally on your computer.
  • Not that it is a big deal, but Live Writer seems to have better preview support, at least with my current theme.
  • Live Writer also integrates nicely with Live’s maps and photo albums. Images are actually easier to integrate with in Live Writer too, more directly editable properties.
  • Live Writer also support HTML tables, which you have to create by hand with ScribeFire.
  • The spelling checker seems better in Live Writer too. Unfortunately, neither one has an integrated thesaurus.

So, if you are blogging on Windows and want to use a nice little editor, give it a try. I think you will be generally surprised by this Microsoft product.

https://www.beilers.com/wp-content/plugins/sociofluid/images/digg_48.png https://www.beilers.com/wp-content/plugins/sociofluid/images/reddit_48.png https://www.beilers.com/wp-content/plugins/sociofluid/images/dzone_48.png https://www.beilers.com/wp-content/plugins/sociofluid/images/stumbleupon_48.png https://www.beilers.com/wp-content/plugins/sociofluid/images/delicious_48.png https://www.beilers.com/wp-content/plugins/sociofluid/images/blinklist_48.png https://www.beilers.com/wp-content/plugins/sociofluid/images/blogmarks_48.png https://www.beilers.com/wp-content/plugins/sociofluid/images/google_48.png https://www.beilers.com/wp-content/plugins/sociofluid/images/facebook_48.png


May 24 2009

Still on the Jetty Bandwagon… Go Embedded?

Category: Eclipse,Software DevelopmentPhil @ 2:23 pm

image I was searching for some information on using the Eclipse IvyDE plug-in and found a post that reminded me of some work I did last summer. For the most part, I’m happy with the way the IvyDE plug-in works, but sometimes you have to be a little tolerant of its usability issues. Every so often, IvyDE seems to forget about my configuration and refuses to add libraries to the class path. My only option is to remove Ivy Dependency Manager and re-add it to the class path.  One problem that I’ve been unable to solve, is the integration of an Eclipse Web Tools Platform (WTP) project and Ivy; I cannot get the Ivy resolved libraries added into a “Dynamic Web Project”, making them available to the Tomcat. I have tried a dozen different configurations and settings with no success. Hopefully, I will get this working in the near future. If anyone has this working, please give me some tips!

The real thought behind this post was echoed in this post by Daniel Spiewak, So Long WTP, Embedded Jetty For Me. I was really fired up about Jetty last summer. When compared to my experience developing Weblogic-based applications, the utter simplicity and flexibility of Jetty was amazing. I was working on a custom Servlet-based web service framework and decided to do my development with Jetty. I created a very small Java program that configured Jetty to deploy my Servlet, in about 20 lines of code! The best part is there was no special Eclipse project type, no special environment, and zero deployment work; making debugging and testing especially easy.  I never used the word embedded when I talked about Jetty, but that was exactly what I wanted. I always deployed in the Weblogic container because of our corporate standards. I should have explored this a little more, further highlighting the point that Weblogic and all of its complexity is truly unnecessary.

Following the BEA Bible, you end up with specific machines, specific file systems, specific networking, and hardwired clusters. Combine that with an environment that is highly controlled, it can take a dozen change control tickets and multiple days to bring up a new instance. Not exactly what I call agile or responsive. How cool is would it be to just drop a WAR file on a machine (any available machine), launch java to bring up a web server, add it to the load balancer and instantly expand your processing capacity? Pretty powerful idea, I think.

Embedding a web server is a good idea when building a web-based application, both for development and operational reasons. A good example is the Hudson Continuous Integration tool. Hudson is distributed as a single WAR file that you can pop in any Servlet container; but it also includes an embedded web server. This approach is becoming more and more common, as several open-source and commercial products are shipping their products with embedded web servers. The real benefit is flexibility. It literally took me seconds to get Hudson up and running; no messing around with Tomcat, no configuring security realms, no anything! It allowed me to focus on Hudson, rather than the environment to make it work. Down the road, if I want to deploy Hudson in the standard application server environment, it should be an easy switch, This is quite different from my recent experience installing a few open-source code review tools; installing multiple Python packages, configure an Apache web server, setting up database servers, etc. I don’t think I have to say much more; the better choice is pretty obvious.

image It is pretty hard to beat the Eclipse WTP – Apache Tomcat integration as a development environment, but directly embedding Jetty into your environment (no WTP) would make the environment even simpler. I have been trying to encourage teammates to develop from a container independent perspective, demonstrating higher productivity with no additional risk to the project. If we can move from large, monolithic applications to smaller, self contained services, the attractiveness of Jetty goes way up. The flexibility of running a moderately sized collection of small, independent services, verses a small tightly coupled clusters of monoliths, has to be an attractive architectural vision.

Unfortunately, many corporations don’t eagerly embrace open-source software solutions, preferring to pay for name recognition and guaranteed support. I personally feel that Jetty is a viable option, but it seems to be relatively unknown to most developers. Apache Tomcat and JBoss have a much higher exposure level, giving them more perceived viability. Jetty is no slouch, check out the Powered by Jetty page. Hopefully, this and Daniel’s post demonstrate there are alternatives to the J2EE Silver Bullet, and that we don’t really need to do everything by the J2EE book. There are a lot of simple alternatives out there for us to take advantage of, all we have to do is keep an open mind!

https://www.beilers.com/wp-content/plugins/sociofluid/images/digg_48.png https://www.beilers.com/wp-content/plugins/sociofluid/images/reddit_48.png https://www.beilers.com/wp-content/plugins/sociofluid/images/dzone_48.png https://www.beilers.com/wp-content/plugins/sociofluid/images/stumbleupon_48.png https://www.beilers.com/wp-content/plugins/sociofluid/images/delicious_48.png https://www.beilers.com/wp-content/plugins/sociofluid/images/blinklist_48.png https://www.beilers.com/wp-content/plugins/sociofluid/images/blogmarks_48.png https://www.beilers.com/wp-content/plugins/sociofluid/images/google_48.png https://www.beilers.com/wp-content/plugins/sociofluid/images/facebook_48.png


May 21 2009

Unbelievably Simple Java Zip Example… And What About Reuse?

Category: Java,Software DevelopmentPhil @ 5:15 pm

I was working on a typical web portal application today and needed to support a multi-file download. Luckily, I had some code which I had used several times before. I started to tweak it for my specific requirements, realizing it was such a bad fit, I quickly tossed it out. My previous implementation worked with physical files and was tightly coupled to a legacy framework. This time, the files were already in memory. I was hoping to find some code that allowed me to build the zip file in memory, rather than dealing with the file system and temporary files. Since the portal user could only download a limited number of files at one time and the files were very small, I didn’t have to worry about memory constraints.

Bottom line, I found the perfect piece of code on Trip over IT. Within 15 minutes, my application was downloading a sweet little zip file! The code was so simple and concise, I had to share it. I will definitely put the code in my tool box of handy snippets. 

Here is a provocative thought: What is the point of a reusable library? Do we focus on reuse because we continually over-design and over-build our software, thinking that we are saving time by building these reusable libraries? Are there alternatives? What about simple, small, and disposable code? Don’t be so attached to your masterpiece. I promise, it will not look so elegant tomorrow! All you really need is Google to find some code to start with. I found this little snippet of code, changed it to fit my problem, and I was done within a few minutes, no support and minimal overhead. Maybe the real reuse is my memory and ability to relocate this snippet in the future… Or am I just crazy?

https://www.beilers.com/wp-content/plugins/sociofluid/images/digg_48.png https://www.beilers.com/wp-content/plugins/sociofluid/images/reddit_48.png https://www.beilers.com/wp-content/plugins/sociofluid/images/dzone_48.png https://www.beilers.com/wp-content/plugins/sociofluid/images/stumbleupon_48.png https://www.beilers.com/wp-content/plugins/sociofluid/images/delicious_48.png https://www.beilers.com/wp-content/plugins/sociofluid/images/blinklist_48.png https://www.beilers.com/wp-content/plugins/sociofluid/images/blogmarks_48.png https://www.beilers.com/wp-content/plugins/sociofluid/images/google_48.png https://www.beilers.com/wp-content/plugins/sociofluid/images/facebook_48.png


May 19 2009

How to customize your jUnit Behavior and Interaction

Category: Java,Misc,Testing,UbuntuPhil @ 8:17 pm

I have tried to walk through the jUnit source code a couple of times, trying to figure out how to implement my own behavior; only to give up in frustration (no I did not read the documentation, real developers don’t do that, they Google!) Why would I want to implement my own behavior? Well, it always seems to center around integrating with Spring. I usually want/need to do control the way the context is being created or do something immediately before the context is loaded or as the context is loading; something that might not be possible not possible using a @BeforeClass annotation.

This problem was actually related to my previous blog on Implementing Custom Scopes in Spring. Because I implemented some beans using the session scope, I kind of created a catch-22 scenario;  I have tried to capture the problem in bullet form:

  • Each jUnit test needs the ability to specify the specific test user (role, user info, etc.) that is relevant for that individual test
  • The test user profiles are configured and controlled by a Spring managed bean
  • All beans are lazy-init = true and injected into the unit test using the @Resource annotation
  • The session scope beans need to have the SecurityContextHolder configured with the appropriate principal (test user), before they are created
  • So, the problem is: How do you specify the test user, before the session scope beans are created and injected into the unit test class?

In a normal execution environment, using the Spring Security filters and a Servlet, the SecurityContextHolder would have been assigned using the authenticated principal, before creating any Spring dependencies. Because I created my own custom scopes for unit testing, the SecurityContextHolder was null and the session scope beans constructor was failing an assertion (principal != null). I could have easily fixed this by adding a pre-authenticated user to the SecurityContextHolder, using some static method approach,. However, because my mechanism for handling test users was itself a Spring bean, I had no possible way of specifying before the beans were injected into my unit test.

When jUnit 4.0 was released, it added several new constructs that make some very elegant solutions. I don’t think most developer’s ever look beyond the base jUnit functionality; fortunately it seems to solve 99% of the typical test scenarios. The new constructs are actually specified via annotations, they are the @RunWith and @TestExecutionListeners. My example code, can probably be made a little cleaner, but my main goal was to get the unit tests working. Because you don’t directly create any of these objects, you have to be aware of the timing; implement your customizations at  the correct point in the lifecycle. Another interesting problem, is that you don’t actually create the Spring Context, but you can interact with it via listeners.

First, we need a class which extends DependencyInjectionTestExecutionListener. This base class is required when using Spring and provides several override-able methods. I needed to configure the SecurityContextHolder, before any beans were injected into the unit test; I could accomplish this by utilizing the injectDependencies method. To support my testing needs, I added two (2) properties to the sub-class (this could have been cleaner); one to specify a user from a “user provider” factory, and a simpler one that used the user id of the person running the test. As you can see from the code, before an beans are injected into the unit test, I have access to the Spring context. This allows me to request the “user provider” factory and then request a specific test user. At this point, I can now assign the user to the SecurityContextHolder; all before any of the session scope beans are created.

public class AuthorizedTestExecutionListener extends DependencyInjectionTestExecutionListener {

    private TestUserAuthorization defaultAuthorization;
    private String                junitAuthorization;

    public void setJunitAuthorization(final String junitAuthorization) {
       this.junitAuthorization = junitAuthorization;
    }

    public void setDefaultAuthorization(final TestUserAuthorizationdefaultAuthorization) {
       this.defaultAuthorization = defaultAuthorization;
    }

    @Override
    @SuppressWarnings("PMD.SignatureDeclareThrowsException")
    protected voidinjectDependencies(final TestContext testContext) throws Exception {
       if (StringUtils.isNotBlank(junitAuthorization)) {
           final Authentication login = new UnitTestAuthenticationToken(this.getClass().getSimpleName());
           SecurityContextHolder.getContext().setAuthentication(login);
       }
       else if (defaultAuthorization != null) {
           finalTestUserModuleManager manager = (TestUserModuleManager) testContext.getApplicationContext()
                    .getBean(defaultAuthorization.testUserManager());
           final SecureUserInterface user = manager.find(defaultAuthorization.principal());
           final Authentication login = new UnitTestAuthenticationToken(user);
            SecurityContextHolder.getContext().setAuthentication(login);
        }

       super.injectDependencies(testContext);
    }
}

Next, we need to extend SpringJUnit4ClassRunner. This class is responsible for for creating the Spring test context and  DI listener class.  By over-ridding the  createTestContextManager, you have the opportunity to configure the test execution listeners.  I  also created two custom annotations, TestUserAuthentication and  JUnitAuthentication.  Using either one of these annotations, I could provide run-time meta-data  to my  custom AuthorizedSpringjUnit4ClassRunner; the meta data was then used to configure my custom  AuthorizedTestExecutionListner.

public class AuthorizedSpringjUnit4ClassRunner extends SpringJUnit4ClassRunner {

    public AuthorizedSpringjUnit4ClassRunner(final Class<?> clazz) throws InitializationError {
       super(clazz);
    }

    @Override
    @SuppressWarnings("PMD.ConfusingTernary")

    protected TestContextManager createTestContextManager(final Class<?> clazz) {

       final TestUserAuthorization defaultUser = clazz.getAnnotation(TestUserAuthorization.class);
       final JUnitAuthorization jUnitUser = clazz.getAnnotation(JUnitAuthorization.class);

       final TestContextManager context = super.createTestContextManager(clazz);

       for (final TestExecutionListener l : context.getTestExecutionListeners()) {
           if(AuthorizedTestExecutionListener.class.isAssignableFrom(l.getClass())) {
               if (defaultUser !=null) {
                    ((AuthorizedTestExecutionListener) l).setDefaultAuthorization(defaultUser);
                }
               else if (jUnitUser != null) {
                    ((AuthorizedTestExecutionListener) l).setJunitAuthorization(clazz.getSimpleName());
                }
            }
        }
       return context;
    }
}

Once you understand what all of the pieces do, they are super easy to customize to provide enhanced behavior. I think my solution provided a very clean, elegant solution for providing test specific user profiles, on a test by test basis.

@RunWith(AuthorizedSpringjUnit4ClassRunner.class)
@TestExecutionListeners(AuthorizedTestExecutionListener.class)
@ContextConfiguration(locations = {//
"/com/beilers/resources/spring/contexts/jUnitContext.xml" //
})

public class UnitTestHelper {
...
}
https://www.beilers.com/wp-content/plugins/sociofluid/images/digg_48.png https://www.beilers.com/wp-content/plugins/sociofluid/images/reddit_48.png https://www.beilers.com/wp-content/plugins/sociofluid/images/dzone_48.png https://www.beilers.com/wp-content/plugins/sociofluid/images/stumbleupon_48.png https://www.beilers.com/wp-content/plugins/sociofluid/images/delicious_48.png https://www.beilers.com/wp-content/plugins/sociofluid/images/blinklist_48.png https://www.beilers.com/wp-content/plugins/sociofluid/images/blogmarks_48.png https://www.beilers.com/wp-content/plugins/sociofluid/images/google_48.png https://www.beilers.com/wp-content/plugins/sociofluid/images/facebook_48.png


May 18 2009

WordPress Code Publishing Plugin

Category: BloggingPhil @ 12:01 am

I thought I would be fancy in my previous post and tried to use a WordPress plug-in to make my code look pretty. I downloaded WP-Syntax and gave it a try. Seemed simple enough <pre lang=”java”>…</pre>. Don’t know what the problem was, but it just toasted my code!  I think it might have to do with remote publishing,  using the XML API. I must have messed with it for about 30 minutes, before I finally gave up and resorted back to simple HTML. I thought I would try one more plug-in tonight; it was called Syntax Hilighter Evolved. The usage is similar to the WP-Syntax, but I finally got this one to work using the built-in WordPress editor.

My next post will be about creating your own Java 1.5 Annotations and adding new behavior to your unit test suite. I thought it was actually a pretty cool exercise… but that is just me!

import java.lang.annotation.ElementType;
import java.lang.annotation.Retention;
import java.lang.annotation.RetentionPolicy;
import java.lang.annotation.Target;

@Retention(RetentionPolicy.RUNTIME)
@Target(ElementType.TYPE)
public @interface TestUserAuthorization {

String principal();

String testUserManager();
}

https://www.beilers.com/wp-content/plugins/sociofluid/images/digg_48.png https://www.beilers.com/wp-content/plugins/sociofluid/images/reddit_48.png https://www.beilers.com/wp-content/plugins/sociofluid/images/dzone_48.png https://www.beilers.com/wp-content/plugins/sociofluid/images/stumbleupon_48.png https://www.beilers.com/wp-content/plugins/sociofluid/images/delicious_48.png https://www.beilers.com/wp-content/plugins/sociofluid/images/blinklist_48.png https://www.beilers.com/wp-content/plugins/sociofluid/images/blogmarks_48.png https://www.beilers.com/wp-content/plugins/sociofluid/images/google_48.png https://www.beilers.com/wp-content/plugins/sociofluid/images/facebook_48.png


May 17 2009

Unit Testing Custom Spring Scopes

Category: Java,TestingPhil @ 6:45 pm

I recently worked on a JSF-based application that was integrated with Spring, both the Core Framework as well as the Spring Security Framework. I certainly don’t have it all mastered, but the experience has given me multiple topics to blog about! We decided to let Spring manage all of the beans, rather than making JSF manage some of the beans and Spring manager the rest. I liked the consistency and thought it would make unit testing easier. Spring provides two basic scopes, singleton and prototype. When you add Spring Security into the mix, you get two additional scopes, one for session and another for request.

This should have been no big deal. To my surprise, when I wrote my first unit test, I discovered the session and request scopes were not supported; the bean factory threw an unsupported scope exception when I asked for the bean. Googling did not lead to any exact answer, but I found lots of examples; many developers seem to implement a thread scope. I simplified one of the many implementations I found, as I only need to support unit testing.

The first step is to build your own class that implements the Spring Scope interface. I created a generic class, such that I could use it for any custom scope.

public class CustomScopeHandler implements Scope {

     private final Map<String, Object> hBeans = new HashMap<String, Object>();

     public Object get(final String name, final ObjectFactory factory) {
        Object result = null;

        if (hBeans.containsKey(name)) {
            result = hBeans.get(name);
        }
        else {
            result = factory.getObject();
            hBeans.put(name, result);
        }

        return result;
    }

    public Object remove(final String name) {
        Object result = null;

        if (hBeans.containsKey(name)) {
            result = hBeans.get(name);
            hBeans.remove(name);
        }

        return result;
    }

    public String getConversationId() {
        Assert.state(true, “Needs to be implmented – ConversationId”);
        return “N/A”;
    }

    @SuppressWarnings(“PMD.DoNotUseThreads”)
   public void registerDestructionCallback(final String name, final Runnable callback) {
        Assert.state(true, “Needs to be implmented – DestructionCallback”);
    }
}

The next step is to add your custom scopes to the IoC container. Using the Spring CustomScoptConfigurer class, you can easily add as many scopes as you like. Pretty simple! Now you can execute your unit tests as you would have initially expected. One thing to be aware of, this implementation treats beans as if they are singletons. You could easily eliminate the Map and return back new instances on each invocation. It all depends on your specific needs, mine were pretty simple.

      <bean class=”org.springframework.beans.factory.config.CustomScopeConfigurer”>
            <property name=”scopes”>
                  <map>
                        <entry key=”request”>
                              <bean class=”test.scope.CustomScopeHandler” />
                        </entry>
                        <entry key=”session”>
                              <bean class=”test.scope.CustomScopeHandler” />
                        </entry>
                  </map>
            </property>
      </bean> 

https://www.beilers.com/wp-content/plugins/sociofluid/images/digg_48.png https://www.beilers.com/wp-content/plugins/sociofluid/images/reddit_48.png https://www.beilers.com/wp-content/plugins/sociofluid/images/dzone_48.png https://www.beilers.com/wp-content/plugins/sociofluid/images/stumbleupon_48.png https://www.beilers.com/wp-content/plugins/sociofluid/images/delicious_48.png https://www.beilers.com/wp-content/plugins/sociofluid/images/blinklist_48.png https://www.beilers.com/wp-content/plugins/sociofluid/images/blogmarks_48.png https://www.beilers.com/wp-content/plugins/sociofluid/images/google_48.png https://www.beilers.com/wp-content/plugins/sociofluid/images/facebook_48.png


May 14 2009

Nifty Firefox Plug-ins, Ghostery and YSlow

Category: BloggingPhil @ 8:51 pm

I found a cool little plug-in for Firefox last week called Ghostery. It alerts you about the web bugs, ad networks and widgets on every page that you visit. It is really eye opening, to see how many hidden scripts are embedded in web pages. I am kind of addicted to it now, I feel like I am missing something when switching back to Internet Explorer! The little window to the right is displayed when you visit my blog.

Another amazing observation is how many sites have Google Analytics embedded in them. I have been using WordPress Stats to monitor my blog for the last couple of years. When I switched to Bluehost, I decided to enable Google Analytics for my site, as well as my wifes. If you have not checked out Google Analytics, you should seriously check it out… It is very well done, generates volumes of metrics, and extremely easy to add to your blog or website.

I have already blogged about ScribeFire in the past, I use ScribeFire to do all of my blogging; it is a really nice little tool to create new and edit content on your site. A co-worked hipped me to another interesting plug-in a few weeks ago called YSlow, which is integrated with Firebug.  If you are developing web pages and are concerned about the rendering speed, these two plug-ins look to be the answer. YSlow analyzes web pages and suggests ways to improve their performance. Pretty cool idea! I seem to spend more time on the backend plumbing, but hope to look into these tools more in the the near future.

https://www.beilers.com/wp-content/plugins/sociofluid/images/digg_48.png https://www.beilers.com/wp-content/plugins/sociofluid/images/reddit_48.png https://www.beilers.com/wp-content/plugins/sociofluid/images/dzone_48.png https://www.beilers.com/wp-content/plugins/sociofluid/images/stumbleupon_48.png https://www.beilers.com/wp-content/plugins/sociofluid/images/delicious_48.png https://www.beilers.com/wp-content/plugins/sociofluid/images/blinklist_48.png https://www.beilers.com/wp-content/plugins/sociofluid/images/blogmarks_48.png https://www.beilers.com/wp-content/plugins/sociofluid/images/google_48.png https://www.beilers.com/wp-content/plugins/sociofluid/images/facebook_48.png


May 13 2009

WordPress Migration Complete….

Category: BloggingPhil @ 12:03 am

I finally am back in the the blogging business. Moving the actual domain from my local machine to Bluehost was pretty simple, most of the problems I encountered were self induced!! It was a little more tricky to move my WordPress site from one domain (home.beilers.com) to another (beilers.com), but not really very hard.  Things to be aware of:

  1. Kind of funny, the support staff knew exactly how to answer my question, just like a script! After you export your data from your old database and import into the new database, you need to change two (2) rows in the wp_options table,  ids #1 and #39 need to be updated to the new domain URL. Nice magic numbers!
  2. All of my images were missing in the old posts after the migration, good thing I don’t use a lot of them! Unfortunately after I imported the data, I realized that the full (old) URL was specified in all the <img src=””> tag attributes . I had to go through each post and change it to the new URL and path. Kind of a drag; I probably could have written a database query to do the update, but it just seemed easier to update them by hand! If I would have been more aware, I could have done a global search and replace in the exported text file; that would have been too easy!
  3. There was another small import/export problem. Anywhere I used “quotes” around words, the quote (“) character was displayed in some encoded format, about 5 or 6 characters in length. I don’t remember the exact sequence, but it was pretty visible on the page, especially if you had them in a title. I might have been able to chose an alternative export format to better handle this situation, but by this time, it was too late and I really did not want to start over!
  4. Don’t copy over you plug-ins, it is better to just reinstall them. I simply copied over all my plug-ins and content; which mostly seemed to work.  However when I hit the clean cache button on my wp-super-cache plug-in, it toasted my site (no longer accessible!). I was on the phone with the support team for about 30 minutes. They gave me a little scolding, but are generlly very nice people!  I can’t say enough about how helpful they are…
  5. If you do move your site over, your image upload directory will probably be wrong too. Just go into your WordPress admin panel and update the upload directory to the appropriate location on the server, under your new WordPress installation. I only discovered this after ScribeFire refused to upload new images.
  6. There was one other weird thing, my WordPress account for wp-stats (as well as my Linked.com blog linkage) seemed to take a couple of days to synchronize with the new domain name, the old home.beilers.com reference was there for several days after the switch. It finally switched over to beilers.com this week. All I can say, is ignorance is bliss!

I’m very happy with Bluehost and my decision to migrate over to their servers. I’m set for at least 3 years now, I hopefully won’t have to go through this exercise for quite some time!

https://www.beilers.com/wp-content/plugins/sociofluid/images/digg_48.png https://www.beilers.com/wp-content/plugins/sociofluid/images/reddit_48.png https://www.beilers.com/wp-content/plugins/sociofluid/images/dzone_48.png https://www.beilers.com/wp-content/plugins/sociofluid/images/stumbleupon_48.png https://www.beilers.com/wp-content/plugins/sociofluid/images/delicious_48.png https://www.beilers.com/wp-content/plugins/sociofluid/images/blinklist_48.png https://www.beilers.com/wp-content/plugins/sociofluid/images/blogmarks_48.png https://www.beilers.com/wp-content/plugins/sociofluid/images/google_48.png https://www.beilers.com/wp-content/plugins/sociofluid/images/facebook_48.png


Next Page »